Posts in The Kitchen
CHOCOLATE COOKIE DOUGH BITES
TITLE.jpg

I'm a sucker for anything containing cookie dough. So naturally when I saw Abi post these cookie dough balls on her blog, I knew they had to be shared with you all!

Plus... you won't even have to turn on your oven. If you are like me and don't have air conditioning this is a BIG plus.

ENJOY!

Elizabeth

CHOCOLATE COOKIE DOUGH BITES

You might be thinking "not another healthy "raw" cookie dough ball thing" and you're right, there's a million out there but I've been trying my hand at them for years and while most taste decent they just don't cut it for actually satisfying a real cookie dough craving.

But these were a game changer!

They were super simple to make, they use ingredients I always have and they actually taste like cookie dough, I promise!

(You can even ask my husband, he ate plenty of them).

I kept mine in the freezer which I would highly recommend, it doesn't get much better than frozen cookie dough. And yes, I guess some might not count these as healthy since they have some chocolate chips in it and use sweeteners (god forbid!) but they are loads healthier than the butter/sugar/brown sugar ones so that's good right? Plus the base is cashews which has protein which is enough to make it a health food in my book!

Abi

INGREDIENTS:

2/3 c raw cashews 1/3 c oats 1 Tbsp shredded coconut 2 Tbsp Agave 1 Tbsp Maple Syrup or Honey 1 tsp Vanilla Extract 1/4 c Chocolate Chips (Mini would look nicer but it all tastes the same...)

TO MAKE:

Blend the cashews and oats in a Vita-Mix, food processor, or high speed blender until they're a fine powder. Don't over-blend or you'll wind up with cashew butter very quickly.

Add the agave, maple, vanilla and blend until incorporated. Be careful to just blend in short bursts and only until combined; don't over-process. You know you have “The Right Consistency” of Dough when the dough starts to ball up like a tennis ball and bangs around from side to side in the canister.

Stir in the chocolate chips by hand.

Form into balls and store in freezer.

If dough is sticky, chilling it in the refrigerator or flash-chilling it in the freezer helps make it easier to form into balls.

[print_this]

CHOCOLATE COOKIE DOUGH BITES

INGREDIENTS:

2/3 c raw cashews 1/3 c oats 1 Tbsp shredded coconut 2 Tbsp Agave 1 Tbsp Maple Syrup or Honey 1 tsp Vanilla Extract 1/4 c Chocolate Chips (Mini would look nicer but it all tastes the same...)

TO MAKE:

Blend the cashews and oats in a Vita-Mix, food processor, or high speed blender until they're a fine powder. Don't over-blend or you'll wind up with cashew butter very quickly.

Add the agave, maple, vanilla and blend until incorporated. Be careful to just blend in short bursts and only until combined; don't over-process. You know you have “The Right Consistency” of Dough when the dough starts to ball up like a tennis ball and bangs around from side to side in the canister.

Stir in the chocolate chips by hand.

Form into balls and store in freezer.

If dough is sticky, chilling it in the refrigerator or flash-chilling it in the freezer helps make it easier to form into balls.

[/print_this]

Farmer's Market Salad + Creamy Parsley Dressing
n.jpg

I'm a Fall and Winter kind of girl through and through. I love the boots, the scarves, the rain, the cold...

But I've got to hand it to Summer when it comes to the food.

Fresh, colorful, crunchy, flavorful... Summer produce is my favorite.

I recently took a trip to the Beaverton Farmer's Market and couldn't stop buying fresh vegetables at every tent I walked into. I think I bought something from just about every farm in Oregon!

(some girls get giddy about shoes, I get ecstatic about veggies. Ok, and shoes too)

Today's recipe is a taste of just about everything you will see at your local farmer's market right now and I can't stop eating it. It can easily be adapted and tweaked to include what you have in your fridge and what suits your palate. It can be used as a main course, a side or a refreshing lunch.

If you haven't ventured out to a local farmer's market yet this summer, I highly recommend them!

ENJOY!

Elizabeth

PS: I hope you are enjoying the fresh food to easily available to us right now as I am and I'd love to hear what you've been making in your own kitchens. Leave me a comment or tag your latest creations on Instagram with #hespeaksthekitchen.


FARMER'S MARKET SALAD + CREAMY PARSLEY DRESSING

Serves 4-6

INGREDIENTS:

CREAMY PARSLEY DRESSING:

(adapted from this cookbook)

1 heaping cup of chopped parsley

¼ C olive oil

¼ C real mayonnaise or veganise

3 T apple cider vinegar

2 T water

1 T honey

½ tsp sea salt

¼ tsp pepper


FARMER'S MARKET SALAD:

2 hearts of romaine - chopped

2 big handfuls of arugula – roughly chopped

1 red bell pepper – sliced

2 big handfuls of shredded carrots

4 radishes – thinly sliced

½ C green onions – chopped

½ - 1 C cherry tomatoes – cut in half or quartered

 TO MAKE:

Combine all the creamy parsley dressing ingredients in a blender and blend until creamy.

Combine salad ingredients in a large bowl and toss with desired amount of dressing.

TO SERVE:

This can be enjoyed so many ways! Here are a few ideas...

Serve as a side for salmon or burgers. I have a few recipes on the site that would pair well with and you can find them in the recipe archive.

Toss with grilled chicken.

For a vegetarian option, add garbanzo beans.

Topped with fresh parmesan cheese for a fresh lunch.

[print_this]

Farmer’s Market Salad + Creamy Parsley Dressing

Serves 4-6

INGREDIENTS: 


Creamy Parsley Dressing:

(adapted from this cookbook)

1 heaping cup of chopped parsley

¼ C olive oil

¼ C real mayonnaise or veganise

3 T apple cider vinegar

2 T water

1 T honey

½ tsp sea salt

¼ tsp pepper


Farmer's Market Salad:

2 hearts of romaine - chopped

2 big handfuls of arugula – roughly chopped

1 red bell pepper – sliced

2 big handfuls of shredded carrots

4 radishes – thinly sliced

½ C green onions – chopped

½ - 1 C cherry tomatoes – cut in half or quartered

TO MAKE:

Combine all the creamy parsley dressing ingredients in a blender and blend until creamy.

Combine salad ingredients in a large bowl and toss with desired amount of dressing.

TO SERVE:

This can be enjoyed so many ways! Here are a few ideas...

Serve as a side for salmon or burgers. I have a few recipes on the site that would pair well with and you can find them in the recipe archive.

Toss with grilled chicken.

For a vegetarian option, add garbanzo beans.

Topped with fresh parmesan cheese for a fresh lunch. [/print_this]

HOW TO MAKE ZUCCHINI "NOODLES"
n.jpg

Zucchini bread, stuffed zucchini, zucchini lasagna... is there anything zucchini can't do? Zucchini is an extremely versatile vegetable and my new favorite way to eat them is by making them into noodles.

Yes, noodles.

I know zucchini noodles may sound... well... not very good and a far cry from the real thing. But even my vegetable hating son will eat these and asked me if he can have them for his birthday breakfast.

(I think he still get's confused on what time of day the meal called 'breakfast' is eaten but I'll take it!)

They are the same texture as noodles and have a very mild taste so they take on the flavor of whatever you are cooking with. Zucchini is in season right now and available at just about any fruit stand in your area.

Not to mention it's cheap! Even buying it organic won't break the budget. 

Today's post is a simple, step by step on how to make zucchini noodles. I will refer back to it in the future with recipes to go along with the prepared noodles and you can use them anyway that you would normally prepare pasta.

ENJOY!

Elizabeth

PS: If you have any questions on how to prepare them, feel free to leave a comment and I'm happy to help!

HOW TO MAKE ZUCCHINI "NOODLES"

WHAT YOU WILL NEED:

Zucchini (if you are serving it as a main course, I would recommend at least 2-3 per person)

Sea Salt

Julienne Peeler

Potato Peeler

*if you don't have a julienne peeler, a potato peeler will work. Although I highly recommend a julienne peeler because it will make you job super easy and create better noodles. They can be found at any kitchen store and some grocery stores for about $9.

STEP #1:

Wash and peel the green skin off the zucchini with the potato peeler.

STEP #2:

Hold on to the head of the zucchini and place the julienne peeler at the top of the zucchini. Gentle press down and drag the peeler to the end. You will instantly have a strip of noodles!

Repeat this until you get to the center and start to see seeds. Then flip it over and do the same thing on the other side of the zucchini.

STEP #3:

Preheat your oven to 200F.

Line a baking sheet (or two, depending on how much you are making) with paper towels and spread the noodles over the baking sheet evenly.

Sprinkle with sea salt.

STEP #4:

Place the baking sheet of noodles in the oven for 30 minutes. I promise the paper towels won't catch on fire!

This causes the noodles to "sweat" and release a lot of their water which will prevent your dish from becoming watery when you cook the noodles.

STEP #5:

Remove the baking sheets from the oven and let them cool for a few minutes.

Then, pick up the paper towels, wrap them around the noodles and squeeze out the liquid. You will be amazed at how much water you get out of them!

STEP #6:

At this point they are ready to cook whenever you are ready to eat them. You can saute them in your oil of choice for about 6-7 minutes or you can simmer them in a sauce and allow them to soften.

They are also good raw if you skip the oven process and turn them into a summer salad. Recipe for that coming soon!

A FEW MORE THINGS ABOUT THEM:

1. They can be prepped ahead of time and kept in the fridge until you are ready to cook them. They are a bit labor intensive so I like to prep them in the morning so dinner is quicker at night.

2. They do shrink down quite a bit when cooked, so make more then you think you will need.

3. They taste good as leftovers so make extra for lunch the next day!

ENJOY!


CHOCOLATE PEANUT BUTTER QUINOA COOKIES
IMG_5543.jpg

You are all in for a treat this week... literally! Fallon is back sharing a recipe for some ridiculously good cookies.

A few weeks ago I opened my front door to find a beautiful box filled with these cookies fresh out of the oven and a note from Fallon. They were instantly devoured and throughly enjoyed! Needless to say, Fallon made our day.

Don't let the quinoa throw you off... these cookies won't disappoint!

ENJOY!

Elizabeth


Hi Friends,

I’m excited to be back and sharing a new recipe with you today! If you are anything like me a warm, fresh-out-of-the-oven cookie always seems to be calling my name. (I may have even convinced my husband it’s one of my love languages.) Unfortunately, It’s not always easy to find a good and healthy cookie with food limitations.

Having recently moved to the suburbs, my husband and I are conveniently living with Whole Foods in our backyard. After perusing the bakery many times at Whole Foods and practically drooling over all their yummy treats, I quickly came to love the Peanut Butter Quinoa cookie by Cravin Raven Bakery in Southeast, Portland.

However, I also quickly came to learn that some of my favorite bakery treats weren’t so friendly to my budget. I decided to get creative in the kitchen and come up with my own version of the Peanut Butter Quinoa Cookie, but adding some chocolate on top. Because who doesn’t like to add chocolate to a cookie? After some trail and error, I think I’ve finally settled on this delicious and full of protein recipe.

I hope you enjoy it as much as I do!

Fallon

P.S. If you have a great recipe for cookies, please share with the rest of us! Also, make sure to join in on Instagram and tag you food photos with #hespeaksthekitchen.

CHOCOLATE PEANUT BUTTER QUINOA COOKIES

gluten free, dairy free, soy free

Ingredients:

1/2 cup of oat flour

1 cup of quinoa flakes (these can be found at Whole Foods or New Seasons and look like this)

1/2 cup of gluten-free oats

3/4 cup of peanut butter

1/2 cup of maple syrup

1/8 tsp of sea salt

1 tsp vanilla

1/2 tsp of baking soda

1 tsp of baking powder

1 flax seed "egg" (1 tbs flex seed + 3 tbs water)

Optional Topping:

3/4 cup chocolate chips

1 tbs of maple syrup

To Make:

1. Pre-heat oven to 350.

2. Mix together flax seed egg and set aside.

3. Mix together dry ingredients: oat flour, quinoa flakes, gluten-free oats, baking soda, and baking powder, sea salt and set aside.

4. Mix together wet ingredients: maple syrup, vanilla, and flax seed egg.

5. Begin to add dry ingredients to wet ingredients and mix together until the dough is fully mixed.

6. Roll into balls on caking sheet and flatten (I used a mason jar!).

7. Bake for 12-15 minutes. Keep an eye on them though, as you want them to be light brown.

8. Heat the chocolate chips and maple syrup in a pan on low heat. Stirring every 20-30 seconds to make sure the chocolate doesn’t burn.

9. After removing the cookies from the oven and letting them cool, you can drizzle or full cover them with chocolate over the top.

10. Now they are ready to be served with a glass of almond milk or you favorite summer drink.

All photos by Bethany Small

 [print_this]

CHOCOLATE PEANUT BUTTER QUINOA COOKIES

gluten free, dairy free, soy free

Ingredients:

1/2 cup of oat flour

1 cup of quinoa flakes

1/2 cup of gluten-free oats

3/4 cup of peanut butter

1/2 cup of maple syrup

1/8 tsp of sea salt

1 tsp vanilla

1/2 tsp of baking soda

1 tsp of baking powder

1 flax seed egg (1 tbs flex seed + 3 tbs water)

Optional:

3/4 cup chocolate chips

1 tbs of maple syrup

To Make: 

1. Pre-heat oven to 350.

2. Mix together flax seed egg and set aside.

3. Mix together dry ingredients: oat flour, quinoa flakes, gluten-free oats, baking soda, and baking powder, sea salt and set aside.

4. Mix together wet ingredients: maple syrup, vanilla, and flax seed egg.

5. Begin to add dry ingredients to wet ingredients and mix together until the dough is fully mixed.

6. Roll into balls on caking sheet and flatten (I used a mason jar!).

7. Bake for 12-15 minutes. Keep an eye on them though, as you want them to be light brown.

8. Heat the chocolate chips and maple syrup in a pan on low heat. Stirring every 20-30 seconds to make sure the chocolate doesn’t burn.

9. After removing the cookies from the oven and letting them cool, you can drizzle or full cover them with chocolate over the top.

10. Now they are ready to be served with a glass of almond milk or you favorite summer drink.

[/print_this]

CUMIN TILAPIA + PINEAPPLE + JALAPENO SALSA
cover.jpg

All or nothing. That tends to me my approach to… well… everything.

It’s no surprise that my approach to food can be this way as well.

About two years ago I watched the documentary Forks Over Knives and quickly began to adopt a plant based diet. If you haven’t seen it yet (it is available on Netflix), I can’t recommend it enough. Every American needs to watch it and educated themselves on the food we eat! (That’s the all or nothing side of me talking… can you tell?)

We spent the past year and a half or so eating a mostly plant - based diet and we loved it. I, who am not much of a reader, poured over books and blogs learned everything there was to know about eating a plant-based (vegan) diet. I even told myself “I will do this forever!”

My much more balanced husband encouraged me away from putting a label on how we eat and to still have freedom to enjoy other foods ever so often. Wise man I’ve got!

At first I felt pretty good and was loving a whole new world of plants and grains and tastes I had never experienced before. God is such a creative God and has created so much to be enjoyed!

However for about a year I have just felt “off”. I thought it was the addition of a new baby and the lack of sleep that comes along with that but the older she got the worse I felt so I finally went to the doctor to get the bottom of it.

Several doctors and tests later, I have been diagnosed with something called SIBO which is an overgrowth of bacteria in my small intestines which is giving me all sorts of crazy symptoms and making me sick. It is totally treatable and could potentionally clear up years and years of stomach issues and food sensitivities.

Halleluiah!

However… it requires a crazy restrictive diet for an extended period of time. Let’s just say it makes the Paleo diet look like a cakewalk.

(I’m 10 days in… cake sounds really good right now)

Why am I telling you all of this?

A couple of reasons…

#1: There will be a few changes around The Kitchen when it comes to the new recipes that are posted.  Mostly because they will be based of what I am currently cooking in my home on this crazy SIBO diet!

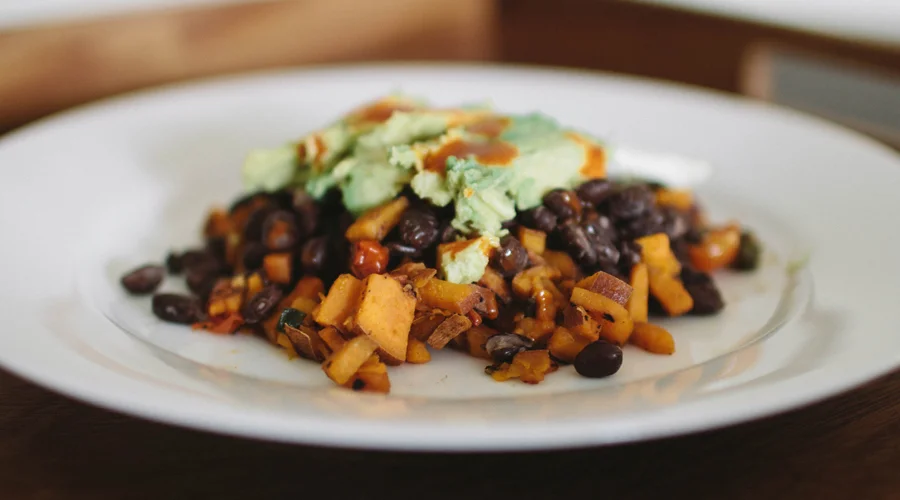
I will be posting more recipes that contain meat, fish and eggs and lots of veggies. I have some friends who will continue to contribute to The Kitchen with plant-based recipes as well so there will be a wider range of recipes coming your way!

#2: I am learning the importance of educating ourselves about the food we eat AND avoiding too many all or nothing extremes when it comes to food.

Once my treatment is over I’m not sure where I will land with the whole world of food but I do know this; God created all foods for our nourishment and for our pleasure. He is a creative God and I want to enjoy His creations this side of Heaven. If we stick to the foods He created (not the man made stuff we have altered quite a bit), we really can’t go wrong.

I am on this journey of learning with you all and I have so much more to learn. My heart and my goal is to inspire you to love real, whole foods and to learn a bit about what you eat in the process.

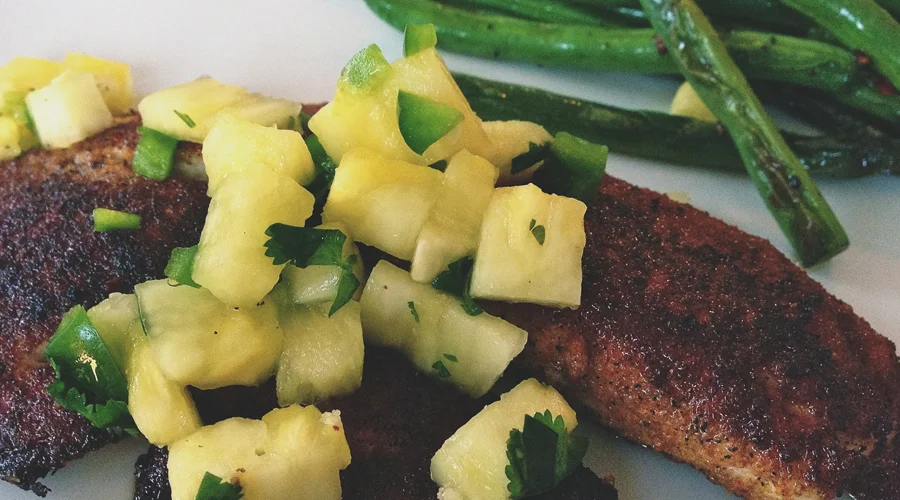
Today’s recipe was inspired by my sister-in-law, Tammy, who created the tilapia rub and I added the salsa for an extra kick of flavor.

ENJOY!

Elizabeth

PS: I always love to hear what you are enjoying making and what you are learning! I’m inspired by your comments and love it when we start conversations about food!

What have you been cooking lately? Anything you’d like to see posted here on the The Kitchen?

CUMIN TILAPIA + PINEAPPLE + JALAPENO SALSA

Serves 4

Gluten, dairy, grain free

INGREDIENTS:

Cumin Tilapia:

4 tilapia fillets  (5-6 oz each)

4 T cumin

1 t smoked paprika (or regular)

¼ t cayenne pepper

¾ t sea salt

Juice from two limes

2 T coconut oil for cooking

Pineapple Salsa:

1 ½ C fresh pineapple

1 jalapeño

¼ C chopped cilantro

Juice from two limes

Sea salt

*If you can, make the salsa a few hours before you plan to eat so the juices can combine and create more flavor.

TO MAKE:

Salsa:

Chop the pineapple into small, bit-sized chunks. Here is a quick tutorial on how to cut a pineapple.

Cut jalapeño long ways and remove the seeds and insides. Finely chop.

Finley chop cilantro.

Combine pineapple, jalapeño and cilantro in a bowl and squeeze the juice from the two limes into the bowl.

Add a pinch of salt and refrigerate for a few hours. You can serve it immediately as well if you don’t have time to prep it early.

Fish:

Combine cumin, paprika, cayenne pepper and salt in a bowl and stir well.

Cut the limes in half and squeeze the juice on both sides of each fillet. ½ a lime for each fillet of tilapia.

Use your hands to rub the cumin mixture on each side of the fillets. Make sure each side is completely coated.

In a cast iron or non-stick skillet, heat the coconut oil.

Add fillets to the hot oil and cook on medium heat for about 6-7 minutes on each side.

When it is finished, it should have a nice brown, crispy layer on each side.

TO SERVE:

Spread a few spoonfuls of the pineapple salsa over the top and enjoy!

You could also add the fish and salsa to a good corn tortilla, top with avocado and turn it into fish tacos!

ENJOY!

[print_this]

CUMIN TILAPIA + PINEAPPLE + JALAPENO SALSA

Serves 4

Gluten, dairy, grain free

INGREDIENTS:

Cumin Tilapia:

4 tilapia fillets  (5-6 oz each)

4 T cumin

1 t smoked paprika (or regular)

¼ t cayenne pepper

¾ t sea salt

Juice from two limes

2 T coconut oil for cooking

Pineapple Salsa:

1 ½ C fresh pineapple

1 jalapeño

¼ C chopped cilantro

Juice from two limes

Sea salt

*If you can, make the salsa a few hours before you plan to eat so the juices can combine and create more flavor.

TO MAKE:

Salsa:

Chop the pineapple into small, bit-sized chunks. Here is a quick tutorial on how to cut a pineapple.

Cut jalapeño long ways and remove the seeds and insides. Finely chop.

Finley chop cilantro.

Combine pineapple, jalapeño and cilantro in a bowl and squeeze the juice from the two limes into the bowl.

Add a pinch of salt and refrigerate for a few hours. You can serve it immediately as well if you don’t have time to prep it early.

Fish:

Combine cumin, paprika, cayenne pepper and salt in a bowl and stir well.

Cut the limes in half and squeeze the juice on both sides of each fillet. ½ a lime for each fillet of tilapia.

Use your hands to rub the cumin mixture on each side of the fillets. Make sure each side is completely coated.

In a cast iron or non-stick skillet, heat the coconut oil.

Add fillets to the hot oil and cook on medium heat for about 6-7 minutes on each side.

When it is finished, it should have a nice brown, crispy layer on each side.

TO SERVE:

Spread a few spoonfuls of the pineapple salsa over the top and enjoy!

You could also add the fish and salsa to a good corn tortilla, top with avocado and turn it into fish tacos!

[/print_this]

SIMPLE SUMMER SALAD: THREE WAYS
summer-salad-cover-photo.jpg

Summer is almost here! Colorful fruits and veggies are filling the fruit stands.

Pasty white skin and unbrellas are on their way out.

I'm ready for both.

This weeks recipe is about as simple as they come but oh - so - good!

Not to mention quite versitle.

Here are three ways to make it a meal:

Lunch:

Toss with steamed brown lentils for some added protien. Trader Joe's sells pre-made steamed lentils with sea salt in their refridgerated produce section. We eat them with just about everything.

Dinner:

Serve with salmon made with this smoked paprika rub and some good, hearty bread.

Side:

Serve on the side with veggie burgers, salmon burgers or your favorite BBQ fair.

Happy almost summer!

ENJOY!

Elizabeth

PS: What are some of your favorite summer meals? I'd love to hear what you are looking forward to creating this summer!


SIMPLE SUMMER SALAD WITH BALSAMIC POPPY SEED DRESSING

serves 4-6

INGREDIENTS:

HONEY BALSAMIC DRESSING

1/4 C olive oil

2 T balsamic vinegar

1 T honey

1 T poppy seeds

pinch of salt

SALAD:

1 bag of organic baby spinach (roughly 10 cups)

2 C organic strawberries (roughly 12 medium strawberries) - cut into bite sized pieces

1/4 of a red onion - thinly sliced

1/4 C pistachios or nuts of choice

1/4 C feta or crumbled goat cheese

TO MAKE:

Whisk together all the ingredients for the dressing. I use a jar with a tight fitting lid and give it a good shake too.

Prep salad ingredients in a large bowl.

Drizzle with dressing and toss well.

Depending on how much dressing you like, you may have leftover dressing. If you do, store in an air tight container at room temperature and make it again tomorrow!

[print_this]

SIMPLE SUMMER SALAD WITH BALSAMIC POPPYSEED DRESSING

serves 4-6

INGREDIENTS:

HONEY BALSAMIC DRESSING

1/4 C olive oil

2 T balsamic vinegar

1 T honey

1 T poppy seeds

pinch of salt

SALAD:

1 bag of organic baby spinach (roughly 10 cups)

2 C organic strawberries (roughly 12 medium strawberries) - cut into bite sized pieces

1/4 of a red onion - thinly sliced

1/4 C pistachios or nuts of choice

1/4 C feta or crumbled goat cheese

TO MAKE:

Whisk together all the ingredients for the dressing. I use a jar with a tight fitting lid and give it a good shake too.

Prep salad ingredients in a large bowl.

Drizzle with dressing and toss well.

Depending on how much dressing you like, you may have leftover dressing. If you do, store in an air tight container at room temperature and make it again tomorrow!

[/print_this]

FOOD FOR LITTLE PALLETS: Better than Larabar Balls
cover.jpg

When I was pregnant I knew it all. I vowed I would have children who would eat eat everything, love every fruit and vegetable and snack on raw broccoli and tomatoes.

Then I had children.

And suddenly I didn't know everything anymore.

If you've been following The Kitchen for any length of time you know I am passionate about feeding my kids with real, whole foods... but that does not mean that my kids always love to eat everything.

For Duke's first year of life, I made most of his food from scratch and he would eat just about anything. However, that slowly began to change as he got older and discovered food outside of pureed veggies. He has always been a big eater and it is hard to keep his little belly full. Yet his ferocious appetite combined with a very selective pallet (aka: pickiness) has presented itself with all sorts of challenges in the kitchen and quickly threw some of my "ideals" out the window.

All mama's know that when you have a hungry, cranky child... you will do whatever it takes to feed them. Now!

And you also know that if you try to force a child to eat something they don't like, you will lose. Every time.

Duke's response to something he doesn't like? "Mom, this is NOT delicious."

Enough said.

These past few years have been a challenge for me to find creative ways to feed my children with nutritious meals and snacks they will actually eat and that fuel their growing, active bodies with good stuff.

Often times the "kid friendly" meals and snacks at the grocery store are not so friendly for their little bodies. (This is were reading labels is super important! Get to know the ingredient list of the food you buy!)

With an active 3 1/2 year old and a wanting to walk so badly 1 year old, we are a big fan of snacks at our house.

Call it low blood sugar or just being a boy but Duke eats every two-three hours or so. The "Mom! I'm STARVING!" is usually my cue it's time for another snack. 

With my own kids as the inspiration, I'm going to start a little mini series and pop in from time to time with some snack ideas and recipes for both kids and grown ups alike. Some super quick and simple and some you can make in large batches and keep in the freezer.

Today's recipe is one of our favorites and a staple in our freezer. They are similar to LaraBars in their ingredients but we think they taste a whole lot better. Duke thinks they are cookies and I eat them for dessert. Win. Win.

A few words of wisdom to you mama's trying to feed picky eaters:

1. Start small. If you find a smoothie recipe you can hide some spinach in, celebrate! Most children won't love kale salad and raw veggies overnight.

2. Make it fun. Kid's love to learn and the kitchen is a great place to teach. If they are involved in the process of making something, often times they are more likely to want to try what they have created. Don't be afraid to get a little silly and excited about explaining why different foods are good for them. We call them "go" foods and "slow" foods at our house. Go foods fuel your body and give you energy to play and learn. Slow foods slow you down a bit and hard for your body to digest.

3. Don't give up. Don't be discouraged if you make something and your kids don't like it. Have a good laugh (or cry) and try something new tomorrow. Eventually you will find a handful of things they like and you can stick to those and keep it simple for a while. We have the privilege and responsibility to steward our children's bodies emotionally, spiritually and physically until they grow up. I want to give them a good foundation and I know you do too!

ENJOY!

Elizabeth

PS: I'd love to hear about your favorite snacks... kid friendly or not! Are there any favorites you would like a healthier version of? I'd love to hear what works and what doesn't in your house.

Join me on Instagram (@emosser) and tag your food photos with #hespeaksthekitchen or leave a comment if you want to share your favorites!

BETTER THEN LARABAR BALLS

makes 20 balls

INGREDIENTS:

1 C raw almonds

1 C raw cashews

14 pitted medjool dates*

2 T natural peanut butter (optional)

1 T vanilla

1 t sea salt

1/4 C dark chocolate chips or carob chips

*Trader Joe's has a large package of dates for under $5 and Costco has them as well

TO MAKE:

*I suggest using a food processor to make these. A blender does work but can be a bit tricky to blend the dates.

Coarsely chop the dark chocolate chips with a knife or food processor and set aside.

Combine almonds, cashews and sea salt in a food processor and grind until it turns into a course powder. Pour it into a bowl and set aside.

Combine dates, peanut butter and vanilla in a food processor until it becomes a thick paste.

Add the nut mixture to the date mixture and blend until combined. It should be pretty crumbly at this point and that's ok. You will mix it more in a bit.

In a large bowl, combine the date and nut mixture with the chocolate chips and stir well. I suggest using your hands to get it mixed well. (while I was up to my elbows mixing up the dough for this recipe I had one child on the toilet calling for a wiper and one child destroying the indoor plants. Might be a good idea to do this during nap time!)

Once dough is combined, take about a tablespoon at a time and roll into a ball. Depending on how big you make them, you should be able to make 18-20. Store them in the fridge or freezer. I make a big batch like this and we keep them in the freezer. You can always half the recipe if you are making them for the first time or don't know how many will get eaten.

ENJOY!

[print_this]

BETTER THEN LARABAR BALLS

makes 20 balls

INGREDIENTS:

1 C raw almonds

1 C raw cashews

14 pitted medjool dates*

2 T natural peanut butter (optional)

1 T vanilla

1 t sea salt

1/4 C dark chocolate chips or carob chips

*Trader Joe's has a large package of dates for under $5 and Costco has them as well

TO MAKE:

*I suggest using a food processor to make these. A blender does work but can be a bit tricky to blend the dates.

1. Coarsely chop the dark chocolate chips with a knife or food processor and set aside.

2. Combine almonds, cashews and sea salt in a food processor and grind until it turns into a course powder. Pour it into a bowl and set aside.

3. Combine dates, peanut butter and vanilla in a food processor until it becomes a thick paste.

4. Add the nut mixture to the date mixture and blend until combined. It should be pretty crumbly at this point and that's ok. You will mix it more in a bit.

5. In a large bowl, combine the date and nut mixture with the chocolate chips and stir well. I suggest using your hands to get it mixed well. (while I was up to my elbows mixing up the dough for this recipe I had one child on the toilet calling for a wiper and one child destroying the indoor plants. Might be a good idea to do this during nap time!)

6. Once dough is combined, take about a tablespoon at a time and roll into a ball. Depending on how big you make them, you should be able to make 18-20. Store them in the fridge or freezer. I make a big batch like this and we keep them in the freezer. You can always half the recipe if you are making them for the first time or don't know how many will get eaten.

ENJOY!

[/print_this]

SWEET POTATO HASH AND BLACK BEAN BREAKFAST
cover_1.jpg

I will just come right out and say it... You have to make today's recipe!

This past summer, we went on a little mini vacation to Eastern Oregon with a few families to soak up some sunshine. One of the mornings, my dear friend Fallon and her husband Alex made one of the most delicious breakfasts I've ever had.

I've been bugging her to share some recipes with you here in The Kitchen for a while and my goodness did she deliver today!

Fallon is a fantastic cook and always learning about new ingredients, trying new things and serving her friends and family her delicious creations.

I know you will enjoy today's recipe as much as I did!

ENJOY!

Elizabeth

Hi Friends,

I was so excited when Elizabeth asked me to share this recipe with you all. My journey to the kitchen is a rather new and ever-so-growing one. It wasn’t until about a little over a year ago that I really started to learn about and appreciate nutritious, whole foods. I was newly married to my husband, Alex, who has this amazing pallet for nutritious, whole foods having grown up experimenting with various kinds of foods having his own food limitations.

I quickly learned my husband’s love for a big, hearty breakfast. Not ever having been a breakfast person myself, I was excited to create something we’d enjoy together.

For the first year and a half of our marriage, we lived in Downtown Portland, which has an abundance of amazing breakfast spots. After trying many of those breakfast spots, I decided to create this recipe by mixing and matching some of our favorite foods together into one flavorful dish.

I hope you enjoy it as much as we do!

Fallon

P.S. I love trying new recipes and filling my little wood recipe box up with all kinds of different food ideas. Would you share some of your favorite recipes from over the years below or take a photo on instagram and tag it #hespeaksthekitchen so I can see what you are up to in the kitchen? Can’t wait to see everyone’s creations, my mouth is watering already!

SWEET POTATO HASH AND BLACK BEAN BREAKFAST

serves 4

Ingredients:

6 medium size sweet potatoes

2 cans of black beans

4 eggs

1 cup of grape tomatoes

¼ cup of green onions

2 tbs. brown sugar

1 tbs. coconut oil

¼ tsp. sea salt

½ tsp cayenne pepper

Black pepper to taste

Avocado (optional)

Cilantro (optional)


1. Rinse and cut sweet potatoes. In a large skillet over medium-low heat add coconut oil and sweet potatoes. Sautee with lid for about 5 minutes, stirring frequently. Add in brown sugar, sea salt, cayenne pepper, black pepper to taste, and stir well. Sautee without lid for another 5 minutes.

2. Cook black beans.

3. Heat a medium skillet over low heat with coconut oil. After coconut oil melts, crack eggs into pan. Cook with lid until your desired yolk consistency. Remove from heat, cover with lid, and let it continue to cook until the yolk has a white consistency.


4. Added chopped green onions and cherry tomatoes to sweet potatoes. Sautee for about 3-5 minutes until sweet potatoes are very tender. Remove from heat.

5. When the sweet potatoes, black beans, and eggs are ready, place on a large plate or in a bowl. Add your desired toppings − we love cilantro and avocado. Leftovers can be reheated for breakfast the following morning.


(all photos by Bethany Small)


[print_this]

SWEET POTATO HASH AND BLACK BEAN BREAKFAST

serves 4

Ingredients:

6 medium size sweet potatoes

2 cans of black beans

4 eggs

1 cup of grape tomatoes

¼ cup of green onions

2 tbs. brown sugar

1 tbs. coconut oil

¼ tsp. sea salt

½ tsp cayenne pepper

Black pepper to taste

Avocado (optional)

Cilantro (optional)

1. Rinse and cut sweet potatoes. In a large skillet over medium-low heat add coconut oil and sweet potatoes. Sautee with lip for about 5 minutes, stirring frequently. Add in brown sugar, sea salt, cayenne pepper, black pepper to taste, and stir well. Sautee without lid for another 5 minutes.

2. Cook black beans.

3. Heat a medium skillet over low heat with coconut oil. After coconut oil melts, crack eggs into pan. Cook with lid until your desired yolk consistency. Remove from heat, cover with lid, and let it continue to cook until the yolk has a white consistency.

4. Added chopped green onions and cherry tomatoes to sweet potatoes. Sautee for about 3-5 minutes until sweet potatoes are very tender. Remove from heat.

5. When the sweet potatoes, black beans, and eggs are ready, place on a large plate or in a bowl. Add your desired toppings − we love cilantro and avocado. Leftovers can be reheated for breakfast the following morning.

[/print_this]

APPLE + CINNAMON + OVEN PANCAKE
FF.jpg

It’s funny how food is connected to memories. I remember sitting on my grandpa Comer’s lap, leaning against is big grandpa belly and eating a pralines and cream ice cream cone as a little girl.

I remember summer’s spent at my grandparent’s cabin and starting every morning with my grandma’s banana bread.

I remember family movie nights and my mom’s warm tapioca pudding.

Nostalgia is kind of how today’s recipe came about.

For a number of my growing up years my dad traveled quite a bit and the routine changed a little when he was gone.

Without the whole family home to eat dinner every night, my mom would often rent us girls a good chick flick and make a big oven pancake for dinner.

Somehow good food and cheesy chick flicks create lasting memories… deep I know.

Now, I know that most of our comfort foods we know and love are foods we limit our intake of because we know they aren’t good everyday menu items.

But what if we began creating and building memories around meals and foods that nourish our bodies and fuel our active children? What if those comfort foods could actually be good for us?

I’m not talking about eating raw carrots and celery and telling yourself they taste like candy. They don’t and never will.

Healthy, whole foods can be just as (I argue way more) delicious as the comfort foods we try to avoid!

Today’s recipe is a new take on one of my favorite meals and fun memory growing up.

ENJOY!

APPLE + CINNAMON + OVEN PANCAKE

serves 4-5

(vanilla not pictured)

INGREDIENTS:

1 C almond milk or organic whole milk

4 eggs

1 T maple syrup

¾ C oat flour or whole-wheat flour*

¾ tsp salt

2 tsp vanilla

2 T earth balance butter or coconut oil (or organic butter)

3 apples

1/8 C brown sugar

1 tsp cinnamon

*If you use oat flour, it won’t puff up as much as a traditional oven pancake. But I promise it still tastes great!

TO MAKE:

Preheat oven to 500F.

Melt the butter or coconut oil in a cast iron skillet or or 8x8 baking pan.

While the butter it melting in the oven, peal and slice the apples.

Add the sliced apples, cinnamon and sugar to the pan and stir until they are well coated.

Bake for 10 – 15 min or until the apples soften and begin to brown.

While the apples are baking, stir together the flour and salt. Set aside.

Wisk together the milk, eggs, vanilla and maple syrup.

Add the dry ingredients to the wet ingredients and stir well or blend.

Once the apples are done, pour the batter over the apples and then reduce the oven temperature to 425F.

Bake for about 10 min. You just want to check and make sure it has cooked through in the middle but remove it before the edges get too crispy. 10-12 minutes should do the trick.

TO SERVE:

Let it cool for a few minutes and then lightly dust with powdered sugar for some extra pizzazz.

You can eat it as is or drizzle with a little maple syrup.

[print_this]

APPLE + CINNAMON + OVEN PANCAKE

serves 4-5

INGREDIENTS:

1 C almond milk or organic whole milk

4 eggs

1 T maple syrup

¾ C oat flour or whole-wheat flour*

¾ tsp salt

2 tsp vanilla

2 T earth balance butter or coconut oil (or organic butter)

3 apples

1/8 C brown sugar

1 tsp cinnamon

*If you use oat flour, it won’t puff up as much as a traditional oven pancake. But I promise it still tastes great!

TO MAKE:

Preheat oven to 500F.

Melt the butter or coconut oil in a cast iron skillet or 8x8 baking pan.

While the butter it melting in the oven, peal and slice the apples.

Add the sliced apples, cinnamon and sugar to the pan and stir until they are well coated.

Bake for 10 – 15 min or until the apples soften and begin to brown.

While the apples are baking, stir together the flour, baking powder and salt. Set aside.

Wisk together the eggs, vanilla and maple syrup.

Add the dry ingredients to the wet ingredients and stir well or blend.

Once the apples are done, pour the batter over the apples and then reduce the oven temperature to 425F.

Bake for about 10 min. You just want to check and make sure it has cooked through in the middle but remove it before the edges get too crispy. 10-12 minutes should do the trick.

TO SERVE:

Let it cool for a few minutes and then lightly dust with powdered sugar for some extra pizzazz.

You can eat it as is or drizzle with a little maple syrup.

[/print_this]

BRUSSELS SPROUTS + SUN-DRIED TOMATOES + CASHEWS
11.jpg

My mom and I don't have the best history with brussels sprouts. I remember all too well those nights at the dinner table with Mom insisting that I eat at least two bites and Dad emphatically trying to convince me they taste like French fries when you dip them in ketchup.

Not even close Dad. Not even close.

Right after Christmas, my mom and I did the first week of the Whole Living 21 Day Cleanse and basically ate just fruits, vegetables and nuts for 7 days.

(Aside from the devastation of cutting out coffee, it was surprisingly easy and I highly recommend it!)

I’m a huge fan of fruits and veggies but somewhere around day 4 or 5... it was time to find some new ways to eat them.

We happened to be at my parent’s house for dinner and my mom had a moment of creative genius (probably from all the carrots she had been eating) and whipped up today’s recipe.

Brussels sprouts redeemed. 

I know Brussels sprout season has just come and gone but most stores still have them and you can always file this recipe away for next season… if you can wait that long.

ENJOY!

Elizabeth

I’d love to hear your favorite ways to eat Brussels sprouts!

BRUSSELS SPROUTS + SUN-DRIED TOMATOES +CASHEWS

serves 4

INGREDIENTS:

1 LB Brussels Sprouts

¼ Cup cashews (I used raw)

¼ C sundried tomatoes

1 T olive oil

1 tsp minced garlic (optional)

Salt and pepper to taste

TO MAKE:

Finely shred the Brussels sprouts with a sharp knife.

Chop sundried tomatoes and cashews and set aside.

Heat the olive oil in a pan and add shredded brussels sprouts and minced garlic.

Toss them in the pan as they cook and let them soften. About 4-5 min.

Add sundried tomatoes, cashews, salt and pepper and toss. Cook for a few more minutes and taste to be sure it is salted enough. Add more if needed.

Serve immediately.

*You can prep all the ingredients early in the day but I recommend you don’t cook them until you are ready to eat. If reheated, the cashews get soft and it is not quite as good.

TO SERVE: 

Serve warm as a side dish.

Or sometimes I layer a bowl of quinoa or brown rice, the Brussels sprouts and grilled salmon.

[print_this]


BRUSSELS SPROUTS + SUN-DRIED TOMATOES +CASHEWS

serves 4

INGREDIENTS:

1 LB Brussels Sprouts

¼ Cup cashews (I used raw)

¼ C sundried tomatoes

1 T olive oil

1 tsp minced garlic (optional)

Salt and pepper to taste

TO MAKE:

Finely shred the Brussels sprouts with a sharp knife.

Chop sundried tomatoes and cashews and set aside.

Heat the olive oil in a pan and add shredded brussels sprouts and minced garlic.

Toss them in the pan as they cook and let them soften. About 4-5 min.

Add sundried tomatoes, cashews, salt and pepper and toss. Cook for a few more minutes and taste to be sure it is salted enough. Add more if needed.

Serve immediately.

*You can prep all the ingredients early in the day but I recommend you don’t cook them until you are ready to eat. If reheated, the cashews get soft and it is not quite as good.

TO SERVE:

Serve warm as a side dish.

Or sometimes I layer a bowl of quinoa or brown rice, the Brussels sprouts and grilled salmon.

[/print_this]


TEMPEH + VEGGIES SPAGHETTI
t.jpg

I’m pretty sure pasta is my husband’s love language. Duke would eat “clean noodles”, as he calls them, (pasta with nothing on it) for every meal of the day if I let him.

So, naturally, any meal that consists of pasta in any form makes my boys happy!

Whether you have been cooking your whole life or just learning to find your way around the kitchen, spaghetti is a pretty simple meal to make. However, it is often filled with sausage or ground beef and packed with Parmesan cheese to create more flavor.

Sometimes these additions can turn it into a meal that slows you down instead of one that fuels your body... and if you are anything like me, you need all the energy you can't get!

I’m not a fan of fake meat substitutes due to the fact that they are usually full of ingredients that don’t add a whole lot of nutritional value.

And they often taste, well...fake.

That’s why tempeh (pronounced tem-PAY) is a great product to use in dishes that could really use a “meat like” flavor and texture if you are trying to eat a plant based diet . And it is great for added protein.

So what is tempeh?

  • Tempeh is a nutritional superhero. Tempeh's fermentation process and it’s retention of the whole bean give it a higher content of protein, dietary fiber and vitamins compared to tofu, as well as firmer texture and stronger flavor.
  • Tempeh is a great choice for people who have difficulty digesting plant-based high-protein foods like beans and legumes or soy foods such as tofu. Because tempeh is a fermented soy product, its enzymes are partially broken down, making it easier to metabolize.
  • Tempeh has a bit of a nutty flavor and easily takes on the flavors of whatever you are cooking it with. It works great in tacos, stir fries, salads and just about anything else you can think of. It can be crumbled or cut into strips.
  • Most grocery stores carry tempeh, you just might have to ask where to find it.

This recipe is my take on healthier, “meaty” spaghetti and a warm comfort food on a cold rainy day.

I’m still working on convincing Duke to eat more then just “clean noodles” and that vegetables will give him strong muscles like his dad… but this spaghetti is a start!

ENJOY!

Elizabeth

TEMPEH AND VEGGIE SPAGHETTI

dairy free

serves 6

INGREDIENTS: 

  • 1 bell pepper
  • 1 medium zucchini
  • 1 small onion
  • 4-5 mushrooms
  • *1 package of tempeh
  • *3 cups marinara sauce
  • 3 T (or more) nutritional yeast (this can be found in bulk at Winco, Whole Foods or New Seasons. It adds a cheese - like flavor and is packed with vitamin B12)
  • 2 t garlic powder or minced garlic
  • 1/4 t pepper
  • 1/4 t sea salt
  • A few dashes of cayenne pepper (optional)
  • 1 package of whole wheat or brown rice noodles

*I used the Organic Three Grain Tempeh from Trader Joe’s for $1.39. It does contain barley which contains gulten but original tempeh is gluten free and only contains soy.

*I keep it super simple and use the jarred sauce but you can make your own too.   I use the Organic Tomato Basil Marinara Sauce from Trader Joe’s.

*Anything goes with the veggies! Add whatever you think sounds good.

TO MAKE:

Heat about a tablespoon of olive oil in a large pan over medium heat and add chopped onion and crumbled tempeh.

To crumble the tempeh, simply break it up with your hands until it is all crumbled into bit sized pieces.

After the mixture begins to brown, add chopped bell pepper, zucchini and mushrooms. Stir well and let the veggies begin to cook up.

After a few minutes, add nutritional yeast, garlic, pepper, salt and cayenne pepper.

Let the veggies cook up until they are just beginning to soften and brown and then add the marinara sauce.

Let the sauce mixture simmer for 10 – 15 minutes on low so that all the flavors can combine and do their magic.

While your sauce is simmering, cook up some noodles in salted water.

TO SERVE:

Serve over noodles of your choice and top with fresh basil.

ENJOY!

[print_this]

TEMPEH AND VEGGIE SPAGHETTI

dairy free

serves 6

INGREDIENTS: 

  • 1 bell pepper
  • 1 medium zucchini
  • 1 small onion
  • 4-5 mushrooms
  • *1 package of tempeh
  • *3 cups marinara sauce
  • 3 T (or more) nutritional yeast (You can buy it in bulk at Winco, Whole Foods or New Seasons. It adds a cheese - like flavor and is packed with vitamin B12)
  • 2 t garlic powder or minced garlic
  • 1/4 t pepper
  • 1/4 t sea salt
  • A few dashes of cayenne pepper (optional)
  • 1 package of whole wheat or brown rice noodles

*I used the Organic Three Grain Tempeh from Trader Joe’s for $1.39. It does contain barley which contains gulten but original tempeh is gluten free and only contains soy.

*I keep it super simple and use the jarred sauce but you can make your own too.   I use the Organic Tomato Basil Marinara Sauce from Trader Joe’s.

*Anything goes with the veggies! Add whatever you think sounds good.

TO MAKE:

Heat about a tablespoon of olive oil in a large pan over medium heat and add chopped onion and crumbled tempeh.

To crumble the tempeh, simply break it up with your hands until it is all crumbled into bit sized pieces.

After the mixture begins to brown, add chopped bell pepper, zucchini and mushrooms. Stir well and let the veggies begin to cook up.

After a few minutes, add nutritional yeast, garlic, pepper, salt and cayenne pepper.

Let the veggies cook up until they are just beginning to soften and brown and then add the marinara sauce.

Let the sauce mixture simmer for 10 – 15 minutes on low so that all the flavors can combine and do their magic.

While your sauce is simmering, cook up some noodles in salted water.

TO SERVE:

Serve over noodles of your choice and top with fresh basil.

ENJOY!

[/print_this]
MAPLE PUMPKIN CINNAMON ROLLS
photo6.jpg

This truly is the most wonderful time of year! Some of my greatest memories come from Christmas morning and all of the traditions surrounding it.

As I got older there was a lingering question in the back of my mind... "what if my husband-to-be doesn't share the same all out love of Christmas that we do? Whatever would we do?!"

My fears were put rest when I met my husband, Brook, and learned that his family does Christmas just as big (if not bigger) then my family!

Duke asked me this year why we don't have 6 Christmas trees like Grammy does.

(Sorry Duke, we might need a bigger house for that)

Like some of you, many of our traditions involve food. Really good food. 

For the past few years I have been trying to reinvent some of those same recipes we all drool over and swap out some the ingredients to make them a bit healthier.

I make these cinnamon rolls every Christmas morning for my little family and then again a few days later when we celebrate with my extended family. Feel free to play with the recipe and use different flours or frostings... anything goes when it comes to cinnamon rolls!

I hope you all have a memory filled Christmas!

ENJOY!

Elizabeth

MAPLE PUMPKIN CINNAMON ROLLS

dairy free

makes: 7-8 rolls

DOUGH:

2 1/2 t yeast (one packet) 1 C unsweetened vanilla almond milk (or milk of choice) + t sugar* 1/2 C puréed organic pumpkin 1 t real vanilla 1/4 organic cane sugar 2 C whole wheat flour + more for kneading 1/2 C  oat flour or unbleached all purpose flour 1 T baking powder 1/2 t salt 1 T pumpkin pie spice 2 t cinnamon

*after many failed attempts to activate the yeast, I finally discovered that yeast needs a little sugar to activate and unsweetened vanilla almond milk doesn't have any sugar. Adding a little sugar to the mixture does the trick!

FILLING:

1/4 c + 2 T melted earth balance butter (or butter) 1/2 organic brown sugar 2 T maple syrup 1 T cinnamon

ICING:

1 1/2 C organic powdered sugar 1 T maple syrup 1 T earth balance butter (or butter) 2 T almond milk ( or milk of choice) 1/2 t cinnamon

TO MAKE:

Heat almond milk to warm and stir in yeast and sugar. Set aside for about ten minutes or until there is a thick layer of foam on top.

Sift together flours, sugar, spices, baking powder and salt.

Mix together pumpkin, vanilla and yeast mixture.

Slowly combine wet and dry ingredients until dough forms.

Transfer dough to a lightly floured surface and knead for a minute or two adding more flour until the dough is no longer sticky.

Using a rolling pin, roll dough out into a large rectangle.

Spread melted butter and syrup over the rolled out dough and sprinkle evenly with brown sugar and cinnamon.

Roll the dough into a log and cut into 7-8 rolls.

Place the rolls into a greased baking pan and allow them to rise in a warm spot for about an hour.

Bake at 375F for 22 - 24 minutes. I like to keep them a bit doughy because they tend to cook a little more after coming out of the oven.

* If you aren't baking them right away you can cover them and place them in the fridge overnight or until you want to bake them. Allow them to rise and then bake.

While the rolls are baking, mix together the icing ingredients.

Drizzle icing over the cinnamon rolls when they come out of the oven and serve.

* you can make the icing ahead of time. Just allow it to reach room temperature for easier spreading.

Enjoy!

[print_this]

MAPLE PUMPKIN CINNAMON ROLLS

dairy free

makes: 7-8 rolls

DOUGH:

2 1/2 t yeast (one packet) 1 C unsweetened vanilla almond milk (or milk of choice) + t sugar* 1/2 C puréed organic pumpkin 1 t real vanilla 1/4 organic cane sugar 2 C whole wheat flour + more for kneading 1/2 C  oat flour or unbleached all purpose flour 1 T baking powder 1/2 t salt 1 T pumpkin pie spice 2 t cinnamon

*after many failed attempts to activate the yeast, I finally discovered that yeast needs a little sugar to activate and unsweetened vanilla almond milk doesn't have any sugar. Adding a little sugar to the mixture does the trick!

FILLING:

1/4 c + 2 T melted earth balance butter (or butter) 1/2 organic brown sugar 2 T maple syrup 1 T cinnamon

ICING:

1 1/2 C organic powdered sugar 1 T maple syrup 1 T earth balance butter (or butter) 2 T almond milk ( or milk of choice) 1/2 t cinnamon

TO MAKE:

Heat almond milk to warm and stir in yeast and sugar. Set aside for about ten minutes or until there is a thick layer of foam on top.

Sift together flours, sugar, spices, baking powder and salt.

Mix together pumpkin, vanilla and yeast mixture.

Slowly combine wet and dry ingredients until dough forms.

Transfer dough to a lightly floured surface and knead for a minute or two adding more flour until the dough is no longer sticky.

Using a rolling pin, roll dough out into a large rectangle.

Spread melted butter and syrup over the rolled out dough and sprinkle evenly with brown sugar and cinnamon.

Roll the dough into a log and cut into 7-8 rolls.

Place the rolls into a greased baking pan and allow them to rise in a warm spot for about an hour.

Bake at 375F for 22 - 24 minutes. I like to keep them a bit doughy because they tend to cook a little more after coming out of the oven.

* If you aren't baking them right away you can cover them and place them in the fridge overnight or until you want to bake them. Allow them to rise and then bake.

While the rolls are baking, mix together the icing ingredients.

* you can make the icing ahead of time. Just allow it to reach room temperature for easier spreading.

Enjoy!

[/print_this]

CHAPTERS
glimpses.jpg

(source)

Sometimes I think life is like a chapter book. 

All the chapters connect to each other yet no two chapters are the same.

Some are filled with details and history. Some with drama and intrigue.  All are necessary to tell the story.

I tend to want to read ahead and see what’s next which can cause me to miss the right now.

I’m sure I am not alone. 

These past few months have brought about a lot of learning and growing and stretching and asking God “what story are you trying to write?”.

God has blessed me beyond belief with a wonderful husband, two growing-up-way-too-fast children and this incredible blog to be a part of.

Working with my mom and helping her spread the words that God has given her is something I treasure. Not to mention the fact that so many of you read The Kitchen each week... it blows my mind and delights by soul. Thank you. 

Yet somehow I have been finding myself in a place I don’t want to stay…. too busy to do the things that are the most important in my current chapter…

Loving, caring for, serving and making space for my husband and my family.


Because sometimes the most important things look like taking the time to have a dance party with Duke in the hallway.

(I can’t dance)

And sometimes they look like lying on the floor and teaching Scarlet to say “mama”

(the only word she will say is “Dada”. All day long.)

Other times they look like having a cup of coffee and talking to Brook instead of working on my “to-do” list.

A perfectionist at heart, I can sometimes get so focused on tasks and making everything just right that I miss the simple joys along the way.

In this next chapter of my life I know God is asking me to strip away all the things that aren’t the most important and simplify a bit.

So I will be doing a little less blogging and a few more park days, dance parties, impromptu dessert making and whatever else may come about in the day-to-day.

As for THE KITCHEN… 

This has been a tough one for me as I LOVE to cook and LOVE to share with all of you.

For now, I’m going to keep the conversation going and pop in every month or so with a new recipe or two.

I am excited about this next chapter and I would love to hear what God is teaching you as well!

I hope to be back right before Christmas with a cinnamon roll recipe.

Until we talk again,

Elizabeth

BUTTERNUT SQUASH SOUP
featured.jpg

I love butternut squash. So much so that I just had my husband pick up 20 (yes 20) of them on this way home from work a few days ago.

(They are $1.39 at Trader Joe's for few more days and they last in the cupboard for 3 months.)

I'm either smart or a horder.

Today's soup recipe is one of my favorite meals to make this time of year. This recipe was passed on to me from a friend a few years ago and I'm not even sure where it came from originally but I promise it won't dissapoint... even if you aren't as into butternut squash as I am.

It is an easy soup to make ahead of time, freeze or take to a family in need of a meal.

For as long as I can remember my family has been having soup for dinner on Christmas Eve and this one will be added to the menu this year!

ENJOY!

Elizabeth


BUTTERNUT SQUASH SOUP

INGREDIENTS:

3 T olive oil

2 C chopped onions

2 T fresh Italian Parsley - chopped

2 t fresh sage - chopped

4 - 5 C butternut squash - peeled, seeded and cut into 1/2 in cubes

1 1/2 t course sea salt

1 garlic clove - minced

5 C organic vegetable broth

TO MAKE:

Add onions, parsley and sage and saute until onions are softened, about 5 minutes.

Add squash and coarse salt and saute until squash softens and onions are golden, about 6 minutes.

Add garlic, stir for 1 minute.

Add vegetable broth and bring to a boil.

Reduce heat, cover and simmer until squash is very soft, about 25 minutes.

Cool slightly. Working in batches, puree soup in blender, allowing some texture to remain. Return soup to pot and thin with stock if desired.

Here is the secret: add a few dashes of cayenne pepper for a little kick. Only add a few dashes at a time and then taste. It heats up quickly!

Season with black pepper and salt if desired.

TO SERVE:

I like to serve it with some homemade croutons on top.

You can make them any way you like. I usually cut a whole wheat, crusty bread into cubes, drizzle, with olive oil and season with garlic powder and sea salt. Bake at 350F for about 20min or until golden brown and crispy.

ENJOY!

[print_this]

BUTTERNUT SQUASH SOUP

INGREDIENTS:

3 T olive oil

2 C chopped onions

2 T fresh Italian Parsley - chopped

2 t fresh sage - chopped

4 - 5 C butternut squash - 1/2 in cubes

1 1/2 t course sea salt

1 garlic clove - minced

5 C organic vegetable broth

TO MAKE:

Add onions, parsley and sage and saute until onions are softened, about 5 minutes.

Add squash and coarse salt and saute until squash softens and onions are golden, about 6 minutes.

Add garlic, stir for 1 minute.

Add vegetable broth and bring to a boil.

Reduce heat, cover and simmer until squash is very soft, about 25 minutes.

Cool slightly. Working in batches, puree soup in blender, allowing some texture to remain. Return soup to pot and thin with stock if desired.

Here is the secret: add a few dashes of cayenne pepper for a little kick. Only add a few dashes at a time and then taste. It heats up quickly!

Season with black pepper and salt if desired.

TO SERVE:

I like to serve it with some homemade croutons on top.

You can make them any way you like. I usually cut a whole wheat, crusty bread into cubes, drizzle, with olive oil and season with garlic powder and sea salt. Bake at 350F for about 20min or until golden brown and crispy.

ENJOY!

[/print_this]

THANKSGIVING AT OUR HOUSE
feature-image1.jpg

Elizabeth and I have spent the last couple of days in the kitchen together. We've laughed and pondered recipes, remembered funny failures of past Thanksgivings, missed Grandma Ruth's gravy, and Rebekah's pies, and tried our best to convert favorite recipes into some semblance of healthy.

Here's a peek into Thanksgiving at our house. Hope you enjoyed yours as much as we enjoyed ours.

With love and gratitude to all of you,

Diane and Elizabeth


(the cooks)

(the dishwashers)

(the food... the vegetables stole the show this year)

(duke enjoying his "clean noodles")

(phil and jackson carving the turkey)

HAPPY THANKSGIVING!

SIMPLE STUFFING
IMG_4318-copy.jpg

(source)

THANKSGIVING MENU WEEK THREE:

I have been feeling a little uninspired this week.

Not sure what to cook.

Not sure what to write about.

I’ve tried everything I could think of to make a stuffing recipe sound interesting and worth reading about…

I still can’t think of a single thing to say.

The Thanksgiving holiday is all about giving thanks and yet we focus way more on the food then anything else… but is that really so bad?

Taking the time to write up some new recipes for this Thanksgiving series (along with some writers block) has really brought to mind the amazing people in my life who enjoy these dishes every year. It has made me realize how thankful I truly am for them and has made me want to serve them and show them my gratitude though food.

This year, why don’t we think through every dish that goes into the meal and make each dish with a purpose? 

Not just because your grandma made it.

Not just because your mom made it.

Think outside the box and plan your menu with the purpose to delight every member of your family. Even the pickiest of eaters (insert my son’s name here).

When you spend hours in the kitchen and have endless dishes to wash, pray for them and serve them in that moment.

You just might feel inspired and filled with joy in the process.

I’m off to add “clean noodles” (noodles with butter and salt) to my menu for my dearest little Duke.

ENJOY!

Elizabeth


SIMPLE STUFFING

INGREDIENTS: 

  • 2 celery stocks - chopped
  • 1 carrot - peeled and chopped
  • 1 onion - chopped
  • 1 leek - ends trimmed and chopped
  • 2 chicken sausage or veggie sausages

*I recommend the ground chicken sausage from Whole Foods or New Seasons in the meat department or the Trader Joe’s Italian Veggie  Sausage

  • 2 T fresh sage
  • 1 T fresh rosemary
  • 2 T fresh basil
  • 3 tsp minced garlic
  • ¼  tsp salt
  • ¼ tsp pepper
  • 3 T earth balance butter or regular butter
  • 5 cups vegetable broth
  • 1 loaf sprouted grain bread – I used Dave’s Killer Bread: Sprouted Wheat
TO MAKE:

Preheat oven to 350F.

Cut the whole loaf of bread into cubes and place on two making sheets. Bake for about 20min, stirring a few times. They should dry out and get a little crispy.

While the bread cubes are baking, melt butter in a large pot and add celery, carrots, leeks, and onions.

Cook for a few minutes until everything begins to soften

Then crumble the sausage into the pan and stir. Then add sage, rosemary, basil, garlic and cook until sausage begins to brown.

Add vegetable broth and let it simmer for a few minutes.

Remove the bread cubes from the oven and transfer them to a large bowl. Pour the broth mixture over the bread cubes and stir well.

Transfer the mixture to a 9x11 baking pan and bake for about 35 - 40 minutes.

ENJOY!

[print_this]

SIMPLE STUFFING

INGREDIENTS: 

  • 2 celery stocks - chopped
  • 1 carrot - peeled and chopped
  • 1 onion - chopped
  • 1 leek - ends trimmed and chopped
  • 2 chicken sausage or veggie sausages

*I recommend the ground chicken sausage from Whole Foods or New Seasons in the meat department or the Trader Joe’s Italian Veggie  Sausage

  • 2 T fresh sage
  • 1 T fresh rosemary
  • 2 T fresh basil
  • 3 tsp minced garlic
  • ¼  tsp salt
  • ¼ tsp pepper
  • 3 T earth balance butter or regular butter
  • 5 cups vegetable broth
  • 1 loaf sprouted grain bread – I used Dave’s Killer Bread: Sprouted Wheat
TO MAKE:

Preheat oven to 350F.

Cut the whole loaf of bread into cubes and place on two making sheets. Bake for about 20min, stirring a few times. They should dry out and get a little crispy.

While the bread cubes are baking, melt butter in a large pot and add celery, carrots, leeks, and onions.

Cook for a few minutes until everything begins to soften

Then crumble the sausage into the pan and stir. Then add sage, rosemary, basil, garlic and cook until sausage begins to brown.

Add vegetable broth and let it simmer for a few minutes.

Remove the bread cubes from the oven and transfer them to a large bowl. Pour the broth mixture over the bread cubes and stir well.

Transfer the mixture to a 9x11 baking pan and bake for about 35 - 40 minutes.

[/print_this]

THANKSGIVING PIES
IMG_0634.jpg

THANKSGIVING MENU WEEK TWO: Two things will be missing from Thanksgiving this year… My sister, Rebekah, and her pies.

Growing up, we all had jobs to do on Thanksgiving.

My mom brined the turkey and baked it to perfection….

I made the mashed potatoes and set the dinner table…

And my sister, Rebekah, always made the pies.

Rebekah would spend hours rolling out the dough and crafting beautiful desserts. She and her husband, Steve, live in LA and the miles between here and there don’t allow for much time spent in the kitchen together anymore.

(Beks and I at her wedding a few years ago)

(I miss you big sis)

This year, we are spending Thanksgiving with my family and I will be attempting to take over Rebekah’s pie baking duties.

So… this week's recipes are all about dessert.

I am a little inexperienced when it comes to pie so I’ve been playing in my kitchen this week and have a new one, an old one and a borrowed one to share with you.

FOR THE NEW: below you will find a recipe for No Bake Pumpkin Pie. I know the ingredients may sound a little odd and “healthy tasting” but I promise that you won’t be disappointed if you give it a try.

Traditional pumpkin pie is typically made with heavy cream, sweetened condensed milk and egg yokes. I wanted to lighten it up a bit and create something for those of us who don’t do well with dairy.

FOR THE OLD: a few months ago I posted a recipe for an apple crisp and I prefer it to apple pie any day.

(there is a pan of it sitting on my counter right now and I may or may not have had some with breakfast. And lunch.)

To make it a bit more pie like, use a pie crust (homemade or store bought) to put on the bottom and use the filling and crumble top from the recipe.

FOR THE BORROWED: this berry pie recipe comes from my all time favorite blog for any kind of dessert or treat. Every single recipe she makes is over the top amazing and she uses all real and simple ingredients.

I hope you enjoy one or all three!

Elizabeth

PS: What are some of your favorite Thanksgiving desserts? I’d love to hear what will be making it your table this year!

NO BAKE PUMPKIN PIE

dairy free/gluten free/vegan

INGREDIENTS:

CRUST:

½ C raw almonds

½ C raw cashews

¼ C unsweetened coconut flakes

2 medjool dates

2 tsp coconut oil

1 tsp vanilla

Pint or two of salt


FILLING:

1 C canned pumpkin

1 C coconut milk*

2 T almond butter

1 tsp vanilla

8 or 9 dates – pitted and soaked

1 tsp pumpkin pie spice

*For the coconut milk, you want to use the full fat, canned coconut milk. Use as much of the thick, white part as you can. Trader Joe’s has an extra thick can of coconut milk that works really well.

TO MAKE:

Remove the pits from the dates and soak them in a bowl of water while you prepare the crust.

Combine almonds and cashews in a food processor and blend until they are all chopped up. Add dates, coconut oil, coconut flakes, vanilla and salt and blend until it reaches a fine texture but stop blending before it turns into a paste.

Pour the crust mixture into a pie pan and use your fingers to press the mixture into the pan until packed tightly and evenly distributed.

Combine pumpkin, coconut milk, almond butter, vanilla, soaked dates and pumpkin pie spice in a blender and blend on high until all the dates are puréed and mixture is smooth.

Pour mixture onto the crust and smooth with a spatula or knife.

Refrigerate overnight to let it to set and thicken.

TO SERVE:

Top with whipped cream and enjoy!

Here is a great non-dairy whipped cream recipe.

[print_this]

NO BAKE PUMPKIN PIE

INGREDIENTS:

CRUST:

  • ½ C raw almonds
  • ½ C raw cashews
  • ¼ C unsweetened coconut flakes
  • 2 medjool dates
  • 2 tsp coconut oil
  • 1 tsp vanilla
  • Pint or two of salt

FILLING:

  • 1 C canned pumpkin
  • 1 C coconut milk*
  • 2 T almond butter
  • 1 tsp vanilla
  • 8 or 9 dates – pitted and soaked
  • 1 tsp pumpkin pie spice

*For the coconut milk, you want to use the full fat, canned coconut milk. Use as much of the thick, white part as you can. Trader Joe’s has an extra thick can of coconut milk that works really well.

TO MAKE:

Remove the pits from the dates and soak them in a bowl of water while you prepare the crust.

Combine almonds and cashews in a food processor and blend until they are all chopped up. Add dates, coconut oil, coconut flakes, vanilla and salt and blend until it reaches a fine texture but stop blending before it turns into a paste.

Pour the crust mixture into a pie pan and use your fingers to press the mixture into the pan until packed tightly and evenly distributed.

Combine pumpkin, coconut milk, almond butter, vanilla, soaked dates and pumpkin pie spice in a blender and blend on high until all the dates are puréed and mixture is smooth.

Pour mixture onto the crust and smooth with a spatula or knife.

Refrigerate overnight to let it to set and thicken.

TO SERVE:

Top with whipped cream and enjoy!

Here is a great non-dairy whipped cream recipe.

[/print_this]


[print_this]

MAPLE APPLE CRISP

INGREDIENTS:

  • 5 heaping cups granny smith apples (4-5 apples), pealed and chopped into small chunks or slices
  • 1 T lemon juice
  • 1 T real vanilla
  • ¼ C real maple syrup
  • 1 T cinnamon
  • ¾ C oat flour (whole wheat flour works too but I think the oat flour makes it moister and tastier)
  • ¾ C slow cooking oats
  • 1 C organic brown sugar
  • 5 T Earth Balance butter (or real butter)

TO MAKE:

Mix apples, lemon juice, vanilla, maple syrup, and cinnamon all together and place in a medium or large baking pan.

Combine flour, oats, brown sugar and butter using a pastry knife or fork until butter is in small chunks and ingredients are combined.

Pour topping over apple mixture and bake at 350 for about 50 min. Check it at that point and see if the top is starting to brown and apples are very soft, it may need a bit more time.

*The key is cooking it long enough for everything to get soft enough to melt in your mouth!

TO SERVE:

Enjoy with vanilla ice cream, coconut milk ice cream or pumpkin ice cream!

OTHER VARIATIONS: 

  • You can use a pie crust (I think the store bought ones are the best!) on the bottom and then follow the same instructions if you want it to be more pie like
  • It is also delicious with real caramel syrup drizzled on top!

[/print_this]

BALSAMIC ROASTED GREEN BEANS + MAPLE SAGE CASHEWS
green-beans-featured.jpg

THANKSGIVING MENU WEEK ONE: There is kind of a Thanksgiving code… a way most of us do Thanksgiving.

Eat whatever you want.

Eat as much as you want.

Take a nap.

Eat dessert.

We all know that we Americans go a little (or a lot) overboard when it comes to our food intake on this glorious holiday.

In fact, we even have articles and websites devoted to “stretching your stomach to accommodate more food” and “how to overcome the post-meal bloat”.

I am all for enjoying amazing food and eating to your hearts content on Thanksgiving day… but how many of us love the leftovers even more than the meal itself?

If you are anything like my family, the Thanksgiving meal is enjoyed for several consecutive days!

So, you do the math. If we make a bunch of not-so-great for you dishes for Thanksgiving, we will most likely be filling our bodies with those ingredients for several days to follow… not just one meal.

What if we could indulge in delicious food on Thanksgiving and use real and fresh ingredients that will fuel your body of the days to come instead of inducing a weeklong food coma?

I’m not talking about eating Tofurky and boiled carrots. I’m talking about mouthwatering, delicious, flavor-packed and nutrient rich foods.

For the next few weeks leading up to Thanksgiving, I will be sharing some recipes I’ve been working on for our Thanksgiving meal this year as well as some favorites from years past and from some of my favorite food blogs.

I’d love to hear what you have planned as well! Feel free to ask questions and share ideas with all of us!

ENJOY!

Elizabeth

PS: at the bottom of this post you will also find my mom's recipe she uses every year to brine her turkey. It is the best turkey there is!

BALSAMIC ROASTED GREEN BEANS + MAPLE SAGE CASHEWS

Serves 10-12

MAPLE SAGE CASHEWS:

INGREDIENTS:

¼ C maple syrup

1 T earth balance butter (or real butter)

2 tsp finely chopped sage (lightly packed)

½ t sea salt

1/8 t cayenne pepper (more if you want a little more kick)

1 ¼ C raw cashews

TO MAKE:

Preheat oven to 375F.

In a small saucepan, heat syrup and butter on low until the butter is melted. Add chopped sage, sea salt and cayenne pepper. Stir well.

Remove from heat and stir in cashews. Coat evenly.

*there will be a little bit of excess liquid but it will absorb into the cashews when baked.

Spread cashew mixture over parchment paper on a baking sheet.

Bake for 25 minutes, stirring every 5 minutes. Stirring is important so they don’t burn!

Let them cool completely before removing from the baking sheet.

*you may have to break them apart a little if they stick together after they cool.


BALSAMIC ROASTED GREEN BEANS:

INGREDIENTS:

8 C fresh or frozen green beans (about two pounds)

1 T olive oil

3 T  balsamic vinegar

1 T maple syrup

1 T minced garlic

3/4 t sea salt

1/3 C dried cranberries

TO MAKE:

Preheat oven to 400F

Stir together olive oil, balsamic vinegar, minced garlic and salt.

Cover two baking sheets with foil and spread the green beans each sheet evenly.

*I used the organic frozen green beans from Costco but I would try fresh green beans next time for a crisper texture. Either one works great though!

Drizzle the balsamic mixture over each baking tray and stir well until the beans are evenly coated.

Bake for about 20 minutes or until the edges of the green beans get a little brown.

TO SERVE:

Spread green beans on a large plate or tray and sprinkle the maple sage cashews and dried cranberries over the top.

ENJOY!

[print_this]

BALSAMIC ROASTED GREEN BEANS + MAPLE SAGE CASHEWS

Serves 8 - 10

MAPLE SAGE CASHEWS:

INGREDIENTS:

  • ¼ C maple syrup
  • 1 T earth balance butter (or real butter)
  • 2 tsp finely chopped sage (lightly packed)
  • ½ t sea salt
  • 1/8 t cayenne pepper (more if you want a little more kick)
  • 1 ¼ C raw cashews

TO MAKE:

  • Preheat oven to 375F.
  • In a small saucepan, heat syrup and butter on low until the butter is melted. Add chopped sage, sea salt and cayenne pepper. Stir well.
  • Remove from heat and stir in cashews. Coat evenly.
  • *there will be a little bit of excess liquid but it will absorb into the cashews when baked.
  • Spread cashew mixture over parchment paper on a baking sheet.
  • Bake for 25 minutes, stirring every 5 minutes. Stirring is important so they don’t burn!
  • Let them cool completely before removing from the baking sheet.
  • *you may have to break them apart a little if they stick together after they cool.

BALSAMIC ROASTED GREEN BEANS:

INGREDIENTS:

  • 8 C fresh or frozen green beans (about two pounds
  • 1 T olive oil
  • 3 T C balsamic vinegar
  • 1 T maple syrup
  • 1 T minced garlic
  • 3/4 t sea salt
  • 1/3 C dried cranberries

TO MAKE:

  • Preheat oven to 400F
  • Stir together olive oil, balsamic vinegar, minced garlic and salt.
  • Cover two baking sheets with foil and spread the green beans each sheet evenly.
  • *I used the organic frozen green beans but I would try fresh green beans next time for a crisper texture. Either one works great though!
  • Drizzle the balsamic mixture over each baking tray and stir well until the beans are evenly coated.
  • Bake for about 20 minutes or until the edges of the green beans get a little brown.

TO SERVE:

Spread green beans on a large plate or tray and sprinkle the maple sage cashews and dried cranberries over the top.

ENJOY!

[/print_this]


[print_this]

DIANE'S TURKEY BRINE:

  • 16 quarts water
  • 1 ½ c kosher salt
  • 1 ½ c pure maple syrup
  • 4 T black peppercorns
  • 16 garlic cloves, crushed
  • 2 lemons, thinly sliced

To prepare the brine, combine all ingredients in a large stockpot, stirring until the salt dissolves.

To prepare the turkey, remove giblets and neck from the turkey. Rinse turkey with cold water; pat dry, trim excess fat.

To brine the turkey, I place it in a plastic garbage sack, which I then put in a large ice chest. Then I carefully pour the brine over the turkey until it is well covered. Tie it up tight and the leakage is minimal. Surround the bag with ice and close it up.

If you have a large enough pot, it would be easier to put the whole thing in the fridge to brine. But who has a pot big enough for a 24-pound turkey?

Allow at least 24 hours for the turkey to soak in the brine.

On Thanksgiving morning, remove the turkey from the brine; pat dry. Starting at the neck cavity, loosen the skin from breast and drumsticks by inserting fingers, gently pushing between skin and meat. Rub thyme mixture under loosened skin, sprinkle inside body cavity.

At this point, I put some of my sausage stuffing into the cavities of the turkey. The stuffing will be somewhat sweet. Do not over fill the cavity. I put the rest of my stuffing into the crock-pot and add plenty of broth so it doesn’t dry out.

Roast the turkey as per directions on the wrapping. After about an hour, start to baste it with the cola/syrup mixture every so often.

I love to use the drippings to make gravy with- but its sweet, so I also usually buy good gravy at Trader Joe’s for those who prefer a more traditional gravy on their turkey and mashed potatoes.

That’s it! Hope you enjoy it as much as we do.

SPICE RUB:

  • 4 T minced fresh thyme
  • 2 T dried rubbed sage
  • 2 T poultry seasoning
  • 1 t black pepper
  • 8 garlic cloves, chopped
  • 4 onions, quartered (I use red onions mostly because they turn a burgundy color)

COLA SYRUP

  • 2 C cola (not sugar free! I use the stuff from Trader Joe’s, as it’s not so full of unpronounceable additives)
  • 1 C pure maple syrup

Boil cola and syrup in a small saucepan for one minute or so until it thickens up a bit.

[/print_this]

PUMPKIN SPICE GRANOLA
7.jpg

Crisp orange leaves that crunch beneath your feet. Bins overflowing with pumpkins and squash outside every grocery store.

Apple cider, apple pie, homemade applesauce.

That’s right, FALL IS HERE! 

(you know you are a true Oregonian when the first rainy day of the season feels like Christmas morning... sometimes I forget that I'm actually a Californian)

I’m am so excited to be back cooking with you and ready to share some new fall recipes that have been making it to our table these past few weeks.

A few things to note before we get cooking… and eating…

  1. If you are curious what this page is all about, click at the top of the page where it says “learn more about The Kitchen”.
  2. In these weekly posts you can count on finding plant based meals that are pretty easy to make and use all real and fresh ingredients. I am passionate about sharing recipes that satisfy your taste buds AND benefit the body God has given you.
  3. You should be warned butternut squash is now in season and I’m slightly obsessed. I will try not to bombard you with too much of it but I make no promises.
  4. All of the warm comfort foods and baked goodness we love to enjoy on cold rainy days can be made with real ingredients and actually be good for you! I will do my best to recreate some of those “comfort” foods and be sure to pack them with fresh and healthy ingredients.
  5. I would love to hear from you! Please leave comments and feel free to ask questions. It fuels me to keep creating when I am in conversation with you!

ENJOY!

Elizabeth

PUMPKIN SPICE GRANOLA

INGREDIENTS:

4 C  oats (slow cooking)

1 C chopped pecans

1 T pumpkin pie spice

¼ t salt


½ C canned pumpkin

¼ C real maple syrup

¼ C honey

¼ C coconut oil


1 C raisins or dried cranberries

TO MAKE:

Preheat oven to 300F.

In a large bowl combine oats, pecans, pumpkin pie spice and salt in a bowl and stir well.

In a smaller bowl combine pumpkin, maple syrup, honey and coconut oil and whisk all together. It’s ok if there are small clumps of coconut oil after you have mixed it all up.

Add wet mixture to dry mixture and stir well. Make sure that you evenly coat the oat mixture.

Divide into two baking sheets and spread it out so that you have a thin layer on each sheet.

Bake for about 45 minutes total, stirring half way through. You want the granola to get brown and crispy.

Allow it to cool completely, then mix in the raisins.

TO SERVE:

We love it with unsweetened vanilla almond milk. It is also delicious with fresh fruit on top.

ENJOY!

[print_this]

INGREDIENTS:

  • 4 C  oats (slow cooking)
  • 1 C chopped pecans
  • 1 T pumpkin pie spice
  • ¼ t salt
  • ½ C canned pumpkin
  • ¼ C real maple syrup
  • ¼ C honey
  • ¼ C coconut oil
  • 1 C raisins or dried cranberries

TO MAKE:

Preheat oven to 300F.

In a large bowl combine oats, pecans, pumpkin pie spice and salt in a bowl and stir well.

In a smaller bowl combine pumpkin, maple syrup, honey and coconut oil and whisk all together. It’s ok if there are small clumps of coconut oil after you have mixed it all up.

Bake for about 45 minutes total, stirring half way through. You want the granola to get brown and crispy.

Allow it to cool completely, then mix in the raisins.

TO SERVE:

We love it with unsweetened vanilla almond milk. It is also delicious with fresh fruit on top.

 [/print_this]
WELCOME TO THE KITCHEN

When my daughter Elizabeth was a little girl she loved to play beside me in the kitchen. Wrapped in a too-large apron, standing on a chair, my little Beth stirred and created and chattered joy beside me.

As she grew older she ignored my closely followed recipes and experimented with ideas of her own. Beetza’s Pizzas were a favorite of her brother’s friends who crowded into our kitchen for more.

Overtime, Elizabeth began to discover both the benefits and the beauty of pure, whole foods. She developed a passion for feeding her own family delicious meals, searching for recipes and inventing her own.

What fun we’ve all had tasting her creations-in-process!

Elizabeth has led the way in our family towards a more God-honoring way of feeding our bodies. She’s helped us to see, in that hope-filled way of hers, the importance of choosing to cook and gather and eat the way we were meant to.

I am proud to learn from my daughter. And I’m thrilled that she’s taking time from her busy life as a wife and mom and ministry leader to share her research and recipes with all of us.

Every Friday Elizabeth will bring us something new. A meal, a treat, a fresh way of preparing what’s in season. She’ll add to our ideas and motivate us to love in the Kitchen.

Now it is my turn to learn at my daughter’s side. Join us, will you?

From my heart,

Diane